Sushi lovers, rejoice! If you’ve ever wanted to enjoy the rich flavors of sushi without the fuss of raw fish, then you’re in for a treat. This article dives deep into the world of baked salmon sushi, showcasing a delightful recipe that’s not only easy to make but also bursting with flavor. Whether you’re a sushi novice or a seasoned pro, you’ll find tips and tricks to master this dish. From ingredient selection to baking techniques, we’ve got you covered. So, roll up your sleeves, and let’s get started on your culinary adventure! For more recipes, visit this link.
Introduction to Baked Salmon Sushi

What is Baked Salmon Sushi?
Baked salmon sushi is a delightful twist on traditional sushi. Instead of using raw fish, this recipe calls for tender, flaky baked salmon, which is both delicious and safer for those hesitant about eating raw seafood. The process combines the techniques of sushi-making with the comforting flavors of baked goods.
Benefits of Using Salmon in Sushi
Salmon isn’t just tasty; it’s also packed with health benefits. Rich in omega-3 fatty acids, this fish can boost heart health and improve brain function. Plus, its natural oils lend a moist texture to the sushi, making every bite a delight. Another bonus? Cooking salmon can enhance its flavor profile, allowing you to experiment with various seasonings. So, if you’re ready to try a new take on sushi, this baked salmon sushi recipe is for you!
Stay tuned as we explore the ingredients needed to whip up this mouthwatering dish.
Ingredients for Baked Salmon Sushi
Essential Ingredients for the Recipe
To create a mouthwatering baked salmon sushi, you’ll need a few key ingredients. Here’s what you’ll want to gather:
- Salmon Fillet: Aim for fresh, high-quality salmon. You can use wild-caught or farm-raised, depending on your preference.
- Sushi Rice: This short-grain rice is sticky and perfect for holding your sushi together.
- Rice Vinegar: This adds a tangy flavor to the rice.
- Nori Sheets: These seaweed sheets wrap around your sushi, giving it that classic look and taste.
- Cream Cheese: For a creamy texture that pairs beautifully with salmon.
- Soy Sauce: A must-have for dipping!
- Optional Ingredients: Feel free to experiment! Some people like to add avocado, cucumber, or even spicy mayo for extra flavor.
Optional Ingredients and Variations
While the essentials are crucial, don’t hesitate to get creative! Consider adding:
- Vegetables: Carrots or bell peppers can add crunch.
- Spices: A dash of wasabi or sriracha can give your sushi a kick.
- Herbs: Fresh cilantro or green onions can brighten up the flavors.
By mixing and matching these ingredients, you can customize your baked salmon sushi recipe to suit your taste. Remember, the sky’s the limit!
Preparing the Salmon for Sushi

Selecting the Right Salmon
Choosing the right salmon is crucial for making the best baked salmon sushi. Look for salmon that’s bright in color and smells fresh. If possible, opt for sushi-grade salmon, which ensures it’s safe to consume. Freshness is key here, as it directly affects the flavor and texture of your sushi.
Marinating the Salmon
Once you’ve got your salmon, it’s time to marinate it. This step enhances the flavor and makes your sushi even more delicious. Here’s how to do it:
- Prepare the Marinade: Mix soy sauce, a splash of rice vinegar, and a hint of sesame oil in a bowl. You can also add a teaspoon of brown sugar for sweetness.
- Marinate: Place your salmon fillet in the marinade and let it soak for about 30 minutes. This allows the flavors to penetrate the fish, resulting in a tender and tasty filling.
- Preheat the Oven: While your salmon is marinating, preheat your oven to 375°F (190°C). This temperature is perfect for baking the salmon without drying it out.
- Bake the Salmon: After marinating, place the salmon on a baking sheet lined with parchment paper. Bake for 15 to 20 minutes or until it flakes easily with a fork.
And just like that, you’ve prepared the star of your baked salmon sushi recipe! Next, we’ll dive into how to make sushi rice, which is essential for holding everything together. For a great guide on homemade sushi rolls, check out this recipe.
Ingredients for Baked Salmon Sushi
Essential Ingredients for the Recipe
To create a mouthwatering baked salmon sushi, you’ll need a few key ingredients. Here’s what you’ll want to gather:
- Salmon Fillet: Aim for fresh, high-quality salmon. You can use wild-caught or farm-raised, depending on your preference.
- Sushi Rice: This short-grain rice is sticky and perfect for holding your sushi together.
- Rice Vinegar: This adds a tangy flavor to the rice.
- Nori Sheets: These seaweed sheets wrap around your sushi, giving it that classic look and taste.
- Cream Cheese: For a creamy texture that pairs beautifully with salmon.
- Soy Sauce: A must-have for dipping!
- Optional Ingredients: Feel free to experiment! Some people like to add avocado, cucumber, or even spicy mayo for extra flavor.
Optional Ingredients and Variations
While the essentials are crucial, don’t hesitate to get creative! Consider adding:
- Vegetables: Carrots or bell peppers can add crunch.
- Spices: A dash of wasabi or sriracha can give your sushi a kick.
- Herbs: Fresh cilantro or green onions can brighten up the flavors.
By mixing and matching these ingredients, you can customize your baked salmon sushi recipe to suit your taste. Remember, the sky’s the limit!
Preparing the Salmon for Sushi
Selecting the Right Salmon
Choosing the right salmon is crucial for making the best baked salmon sushi. Look for salmon that’s bright in color and smells fresh. If possible, opt for sushi-grade salmon, which ensures it’s safe to consume. Freshness is key here, as it directly affects the flavor and texture of your sushi.
Marinating the Salmon
Once you’ve got your salmon, it’s time to marinate it. This step enhances the flavor and makes your sushi even more delicious. Here’s how to do it:
- Prepare the Marinade: Mix soy sauce, a splash of rice vinegar, and a hint of sesame oil in a bowl. You can also add a teaspoon of brown sugar for sweetness.
- Marinate: Place your salmon fillet in the marinade and let it soak for about 30 minutes. This allows the flavors to penetrate the fish, resulting in a tender and tasty filling.
- Preheat the Oven: While your salmon is marinating, preheat your oven to 375°F (190°C). This temperature is perfect for baking the salmon without drying it out.
- Bake the Salmon: After marinating, place the salmon on a baking sheet lined with parchment paper. Bake for 15 to 20 minutes or until it flakes easily with a fork.
And just like that, you’ve prepared the star of your baked salmon sushi recipe! Next, we’ll dive into how to make sushi rice, which is essential for holding everything together.
Sushi Rice Preparation
How to Cook Sushi Rice
To create the perfect baked salmon sushi recipe, you need to start with well-cooked sushi rice. This rice is sticky and will hold everything together beautifully. Here’s how to cook it:
- Rinse the Rice: Begin by rinsing 2 cups of sushi rice under cold water. This removes excess starch and helps the rice become sticky.
- Cook the Rice: Add the rinsed rice to a rice cooker or a pot with 2 ½ cups of water. If using a rice cooker, simply follow the manufacturer’s instructions. If you’re using a pot, bring the water to a boil, then reduce the heat to low, cover, and simmer for about 20 minutes.
- Let it Sit: After cooking, let the rice sit covered for an additional 10 minutes. This resting period allows the rice to firm up a bit.
Seasoning the Sushi Rice
Now that your rice is cooked, it’s time to season it. This step is crucial for a flavorful baked salmon sushi recipe. Here’s how to do it:
- Prepare the Seasoning: In a small bowl, mix ¼ cup of rice vinegar, 2 tablespoons of sugar, and 1 teaspoon of salt. Stir until dissolved.
- Combine: Transfer the warm rice to a large bowl and gently fold in the seasoning mixture. Be careful not to mash the grains; you want to keep them intact.
- Cool the Rice: Allow the seasoned rice to cool to room temperature. This step is important, as hot rice can make your sushi soggy.
And there you have it! Perfectly cooked and seasoned sushi rice, ready to be the star of your baked salmon sushi.
Assembling the Baked Salmon Sushi
Rolling Techniques for Sushi
Now that your ingredients are prepped, it’s time to assemble your baked salmon sushi. Rolling sushi can seem tricky at first, but with a little practice, you’ll be a pro in no time! Here’s a step-by-step guide:
- Prepare Your Workspace: Lay a bamboo sushi mat on a clean surface. Place a sheet of nori (seaweed) on the mat, shiny side down.
- Add the Rice: Wet your hands to prevent sticking, then grab a handful of seasoned sushi rice. Spread it evenly over the nori, leaving about an inch at the top edge.
- Layer the Fillings: Place strips of your baked salmon, along with any optional ingredients like cream cheese or avocado, in a line across the center of the rice.
- Start Rolling: Lift the edge of the mat closest to you and start rolling it away from you, pressing gently but firmly to keep everything together. Roll until you reach the uncovered edge of the nori.
- Seal the Roll: Moisten the edge of the nori with a little water to help seal the roll.
Tips for Evenly Distributing Ingredients
To make sure your baked salmon sushi is bursting with flavor in every bite, follow these tips:
- Don’t Overstuff: It’s tempting to add lots of fillings, but too much can make rolling difficult. Stick to a moderate amount for best results.
- Even Pressure: When rolling, apply even pressure to shape the roll without squishing the ingredients.
- Slice with Care: Use a sharp knife to cut your roll into pieces. Wipe the knife with a damp cloth between cuts to keep the edges clean.
With these techniques, you’ll have beautifully rolled sushi ready to bake. Keep going, as the baking process is just around the corner! For more delicious recipes, check out our other sushi articles.
Baking the Salmon Sushi
Oven Temperature and Baking Time
Now that you’ve assembled your baked salmon sushi, it’s time to bake it to perfection. Preheating your oven is crucial for even cooking, so let’s get started:
- Preheat the Oven: Set your oven to 375°F (190°C). This temperature is ideal for baking the sushi without drying it out.
- Prepare for Baking: Place your rolled sushi on a baking sheet lined with parchment paper. This will prevent sticking and make cleanup a breeze.
- Bake: Once the oven is preheated, pop the sushi in and bake for about 15 to 20 minutes. Keep an eye on it; you want the edges to be golden brown and the filling to be heated through.
How to Achieve the Perfect Texture
To ensure your baked salmon sushi recipe comes out just right, follow these tips:
- Check for Flakiness: The salmon should flake easily when you check it. This indicates that it’s cooked properly.
- Broil for Extra Crispiness: If you like a bit of crunch, turn on the broiler for the last 2-3 minutes. Just watch closely to avoid burning.
- Let It Rest: Once baked, allow the sushi to sit for a few minutes before slicing. This resting time helps set the fillings and makes for cleaner cuts.
With these steps, your sushi will emerge from the oven perfectly baked and ready to impress!
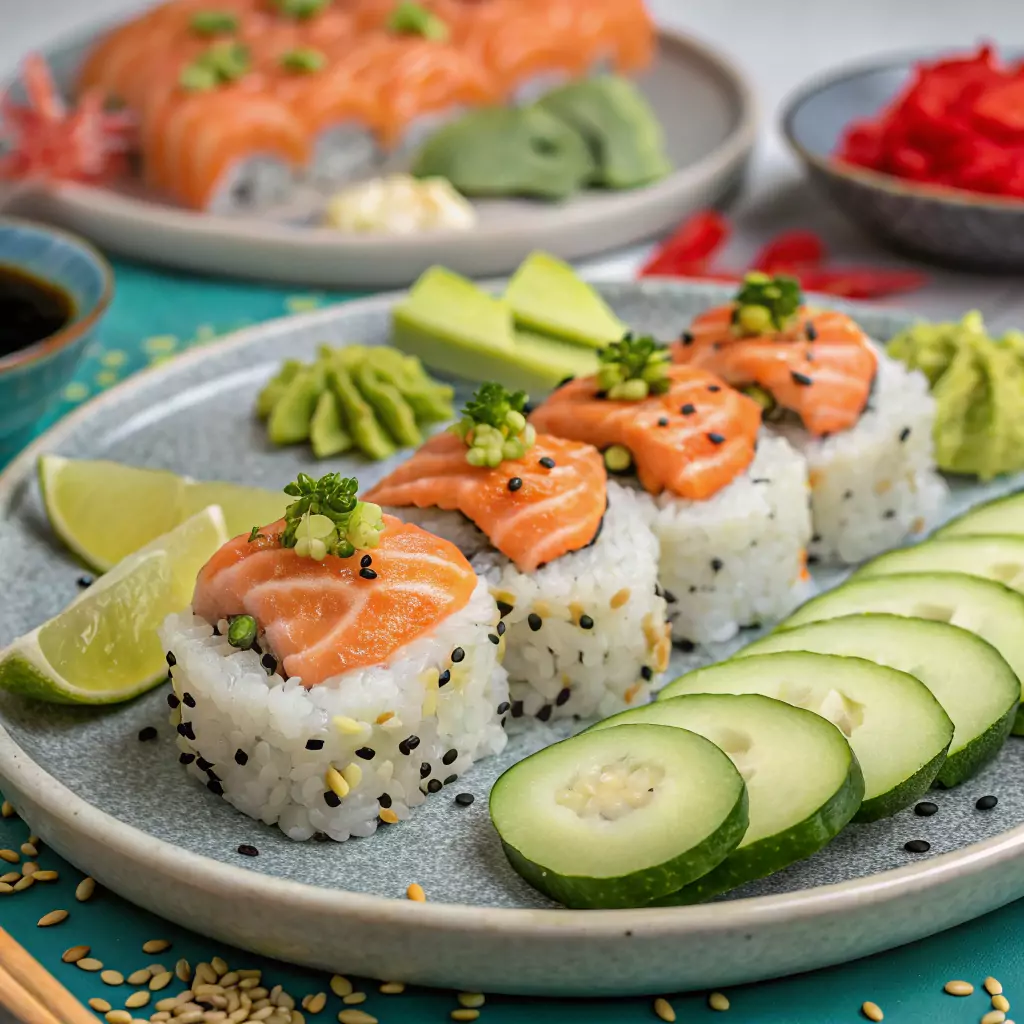
Serving Suggestions and Pairings
Traditional Sushi Accompaniments
Now that your baked salmon sushi is ready, it’s time to serve it up! Here are some traditional accompaniments that can elevate your dish:
- Soy Sauce: A classic dip that adds a savory touch. You can also mix in a bit of wasabi for some heat.
- Pickled Ginger: This tangy side helps cleanse the palate between bites, making it a perfect addition.
- Wasabi: For those who enjoy a spicy kick, a small amount of wasabi can enhance the flavor of the salmon.
Creative Serving Ideas
If you want to get a bit more creative, consider these fun serving suggestions:
- Sushi Platter: Arrange your baked salmon sushi on a large platter with colorful garnishes like sliced cucumbers and radishes for a vibrant presentation.
- Sushi Burritos: For a fun twist, roll your sushi with extra rice and fillings, then slice it into burrito-style pieces for a portable snack.
- Sushi Bowls: Deconstruct your sushi and serve it in a bowl with all the ingredients layered beautifully. This way, everyone can customize their bowl.
No matter how you choose to serve it, your baked salmon sushi recipe is bound to be a hit! Enjoy sharing this delicious dish with family and friends.
Storing Leftovers
Best Practices for Storing Sushi
If you have leftover baked salmon sushi, don’t fret! You can store it properly to enjoy later. Here’s how to keep it fresh:
- Cool Down: First, let your sushi cool to room temperature. This step is important because it prevents condensation in your storage container, which can make the sushi soggy.
- Wrap It Up: Use plastic wrap or aluminum foil to tightly wrap each piece. This helps keep them fresh and prevents drying out.
- Airtight Container: Alternatively, you can place the wrapped sushi in an airtight container. This adds another layer of protection against air, keeping your sushi tasty.
How Long Can You Store Sushi?
When stored correctly, your baked salmon sushi recipe can last in the fridge for about 2-3 days. However, it’s best enjoyed fresh for optimal flavor and texture.
If you want to freeze it, that’s an option too! Just remember that the texture might change slightly after thawing. To freeze, wrap each piece tightly and place them in a freezer-safe bag. They can last for about a month.
When you’re ready to eat, simply thaw in the fridge overnight, and enjoy!
Conclusion and Final Thoughts
Wrapping It Up
And there you have it! Your complete guide to making a delicious baked salmon sushi recipe. From choosing the right ingredients to baking it just right, you now have everything you need to impress your family and friends.
Why You’ll Love This Recipe
Whether you’re a sushi aficionado or new to sushi-making, this recipe is sure to please everyone. The flaky salmon combined with sticky sushi rice and creamy fillings creates a delightful experience in every bite. Plus, it’s a safer option for those who might be hesitant about raw fish.
So, why not give it a shot? Gather your ingredients, roll up your sleeves, and enjoy the process of creating this tasty dish. You might just discover a new favorite recipe to share at your next gathering.
Remember, cooking should be fun, so feel free to adapt the baked salmon sushi recipe to suit your taste. Happy cooking, and enjoy your delicious sushi creation!
🍣 Baked Salmon Sushi Recipe 🍣
Love sushi but want something warm and easy to make? This Baked Salmon Sushi is a game-changer! 🔥🍱 Creamy, savory, and packed with flavor, it’s perfect for sushi lovers who want a quick and delicious meal. Serve it as sushi bake or roll it up in seaweed for an easy hand roll! 😍
Ingredients:
- 2 cups cooked sushi rice
- 2 tbsp rice vinegar
- 1 tbsp sugar
- ½ tsp salt
- 8 oz cooked or canned salmon (flaked)
- ¼ cup Japanese mayo (Kewpie)
- 1 tbsp sriracha (optional for spice)
- 1 tsp soy sauce
- ½ tsp sesame oil
- ½ cup shredded cheese (mozzarella or cheddar)
- 2 tbsp furikake (Japanese seaweed seasoning)
- 1 sheet nori (seaweed) for garnish
- Green onions & sesame seeds for topping
Instructions:
1️⃣ Preheat oven to 375°F (190°C). Lightly grease a baking dish.
2️⃣ Prepare sushi rice: Mix rice vinegar, sugar, and salt into warm rice. Spread evenly in the baking dish.
3️⃣ Mix salmon filling: In a bowl, combine flaked salmon, mayo, sriracha, soy sauce, and sesame oil. Spread evenly over the rice.
4️⃣ Top with cheese & furikake: Sprinkle shredded cheese and furikake seasoning on top.
5️⃣ Bake for 15 minutes or until cheese is melted and bubbly.
6️⃣ Serve & enjoy: Garnish with green onions, sesame seeds, and nori strips. Scoop onto seaweed sheets or enjoy as is!
⏳ Prep Time: 10 min
🔥 Cook Time: 15 min
⏲️ Total Time: 25 min
🍽️ Servings: 4
⚡ Calories per Serving: ~400
🌟 Tips:
✔️ No furikake? Use crumbled nori and sesame seeds as a substitute.
✔️ Want it extra crispy? Broil for 2-3 minutes after baking!
✔️ Try different proteins! Swap salmon for crab, tuna, or shrimp.
🔥 Easy, creamy, and so satisfying! Who’s making this tonight? 😍🍣 Let me know how it turns out! 💬